Full Dynamic Range Tools
Copyright © 2002-2020 Andreas
Schömann
Use cases
FDRTools start in a project management mode. The motivation for using projects is as follows:
projects comprise all images of the exposure series and accompanying parameter settings of the
project editor into a unit. Projects are saved at program exit and reloaded with the next program
start. Projects are useful for:
- Processing of a "days work", i.e. the whole bunch of exposure series one shoots on a foto
tour.
- Processing of HDR panoramas. Here each angle of view results in an exposure series.
- in general: for saving and reloading parameter settings of an exposure series.
Workflow
The (recommended) workflow consists of four steps:
- Creation of projects.
- (Optional) Automated preparation of all the projects for interactive processing.
- Interactive processing of the single projects.
- Automated rendering of all the projects to create the HDR and (tone mapped) LDR images.
Motivation:
the complete processing of an exposure series consisting of several RAW images is rather
time-consuming: loading the images, interactive evaluation of the HDR and tone mapping settings and
especially the rendering of the results take some time. In order to minimise waiting times for the
user it makes sense to separate automatable working steps from interactive working steps. This
separation is supported by FDRTools' project manager when adopting the recommended workflow.
Elements of a project
A project comprises the images of an exposure series and the accompanying parameter settings
from the project editor into one unit. You can create single projects or several projects in one go,
see Overview project management.
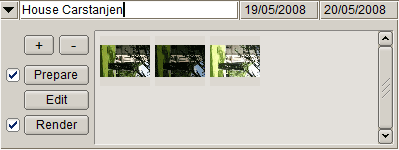
Projects have a name. When a project is created its name is derived from the project images. This automatically created name may be changed at any time. A project shows thumbnails of the project images and has several buttons.
| |
 |
|
| |
Elements of a project |
|
The buttons have the following funtions:
- "+" - Adding of images. Opens the file choosing dialog.
- "-" - Removing of images. Removes selected images from the project. Clicking a thumbnail
selects the image. (Note: removing an image from the project does not delete the original image
from the harddisk.)
- "Prepare" - Preparing of a project. Motivation: loading several RAW files can be tedious.
The point in preparing is to speed up loading and processing of images. Preparing extracts data
from the original images and saves them to the Project directory.
In detail the following data is saved:
- RAW images are "developed" and saved in a compressed format.
- Thumbnails are (if available) extracted and saved.
- Metadata are extracted and saved. You can get an excerpt of the metadata if you move the
mouse over the thumbnail.
In a further step images are aligned with the Tripod method.
- "Edit" - Editing of a project. This opens the project in the editor. (Note: the project
editor lies "above" the project manager: when opening a project for editing the program switches
into editor view at the same time hiding the project manager. The program returns to project view
if the project is closed either via menu Projects -> Close active or alternatively by
clicking the Close button of the window.
- "Render" - Rendering of a project. This renders the HDR and (tone mapped) LDR images in
full image size. For that purpose the source images are loaded to the editor, the processing
parameters - saved in the project - are set and finally the rendered images are saved.
Remark:
Thumbnails may be moved among projects via drag&drop. This is necessary to correct wrong allocations
that may evtl. result from creating projects via the "Many" button.
Overview project management
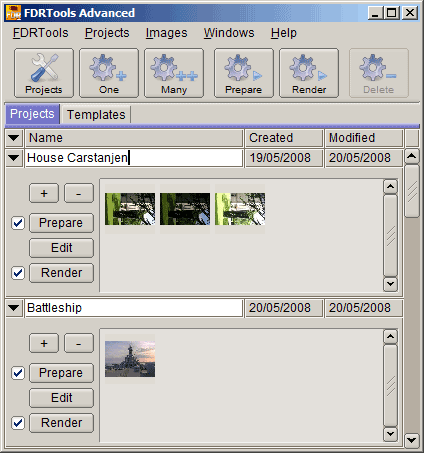
FDRTools start in a project managment view. Here projects can be created, edited, rendered
and deleted again. The buttons of the toolbar allow the following actions:
| |
 |
|
| |
Overview project management |
|
- "Projects" - Allows to configure project management preferences.
- "One" - Creates a single project. The file choosing dialog opens up. Upon finishing file
selection a project is created.
- "Many" - Creates projects by grouping related images from a selection of images. Images
may be grouped by number or by their difference in creation time.
- "Prepare" - Preparing of marked projects. This is a batch process preparing all marked
projects in one go. (Note: currently the process can be started but not paused. Depending on the
number of projects running time can be quite long. The "Include in next run" flag of finished
projects is cleared.)
- "Render" - Rendering of marked projects. This is a batch process rendering all marked
projects in one go. Rendering means: HDR image and (tone mapped) LDR image are calculated in full
size and saved in the Project directory. (Note: currently the
process can be started but not paused. Depending on the number of projects running time can be
quite long. The "Include in next run" flag of finished projects is cleared.)
- "Delete" - Deletion of selected projects. Projects remain in the project view until you
decide to delete them. In order to delete projects select them with a mouse click and then press
the "Delete" button. (Note: deleting a project does not delete the source images from the
harddisk.)
Dialog "Project Manager Settings"
The Project Manager manages Projects and Templates. Templates in principle are Projects too. They differ from "ordinary" Projects in that
- they can be stored in a separate directory, and
- there is a function allowing to copy parameter settings from the Template to ordinary Projects.
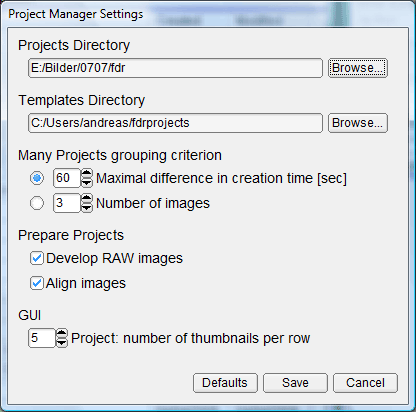
The data belonging to Projects and Templates is stored in directories. You can determine where in the file system the Projects and Templates shall be stored. You can store Projects and Templates in as many places you like and set the directories in this dialog:
| |
 |
|
| |
Dialog "Project Manager Settings" |
|
Projects Directory
The Project data is stored in this directory. In detail the following files are stored:
- File .fdrprojects: contains all projects and their parameter settings.
- File .fdrimages: contains a list of all images related to the projects.
- The image data that is extracted during project preparation, in form of coded files, e.g.
2B5E6CC3C459DA7FD4EC0ACBE7CC5443.
- The HDR and (tone mapped) LDR images that emerge from rendering projects. Naming follows
the scheme: Project name.type.ext. HDR images are of type hdr, LDR images are
accordingly named ldr. ext denominates the extension of the used image format, e.g.
tif.
Templates Directory
The Template data is stored here. Templates are contained in the file .fdrtemplate. Alle files have the same structure as their Project data counterparts.
Many Projects grouping criterion
Projects may be created manually or from a larger set of images in an automated way. For automated generation the images must be grouped somehow so that images belonging together form a project. Images are grouped according to one out of two possible criteria:
- the maximum difference in shooting times.
- the number of images.
Prepare Projects
When there are many projects to process one can save some time if automatable calculations are performed before the actual editing is done. This comprises e.g. the development of RAW images and the alignment of images - although automatic alignment of course delivers an approximate solution only. Currently these two steps are supported. Other precalculations are thinkable but not yet realised.
GUI
For the thumbnail browser within a project you can set the number of thumbnails per row.
Dialog "Missing paths recovery"
If you see this dialog it means that FDRTools while loading projects could not find all related image files.
How is this possible? When creating a project FDRTools remembers where the accompanying images can be found
in the file system. The image paths are saved in the project files. Without this information it would not be
possible to edit a project because the images must be loaded in order to edit a project. Now if you move these
image files within the file system - be it because you want to rearrange your images or because you want to
archive images on external storage media - this invalidates the image paths stored in the project files and
FDRTools can not retrieve the image files any more. The projects are unusable in this state. In order to make
the projects usable again the incorrect image paths must be recovered. The dialog supports you in performing
the recovery.
| |
 |
|
| |
Dialog "Missing paths recovery" |
|
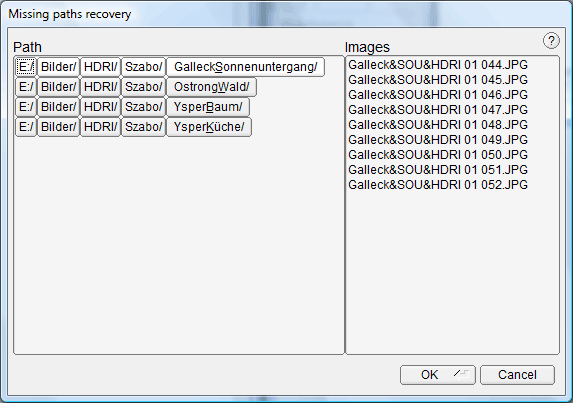
The left side of the dialog shows all the missing directories and the right side lists all the image files that are expected
to reside in the missing directory (move the mouse over the directories to show the accompanying image file names).
The directories are decomposed into their elements, the "path nodes". The path nodes are selectable.
To recover a path you replace the non existing part of the directory path with the correct, existing path,
assisted by the dialog.
How does the recovery work? Let's assume you have moved the folder "E:/Bilder/HDRI/Szabo/" with all its
subfolders to "D:/Bilder/" some time after you created projects with images from these directories. Now FDRTools
is unable to find the (original) directories and you will see the dialog as shown in the figure. To recover the
missing paths choose one of them and click the path node that you have moved, in our example this is "Szabo/".
The dialog for choosing a folder opens up. Navigate to the existing path - in our example this is "D:/Bilder/Szabo"
- and confirm your selection. Now FDRTools replaces the path "E:/Bilder/HDRI/Szabo/" with "D:/Bilder/Szabo" and
checks if the expected image files are there. If so the now corrected path is removed from the list.
Moreover all paths which have "E:/Bilder/HDRI/Szabo/" as part of their path and can be recovered by replacing it
with "D:/Bilder/Szabo" are also removed from the list. So in the example in fact all the missing paths are recovered
by replacing "E:/Bilder/HDRI/Szabo/" with "D:/Bilder/Szabo".
You can close the dialog at any time via the "OK" button. If you have not recovered all missing paths the affected
projects will be visible in the project browser, yet they will be deactivated and thus be unusable. You may then delete
the unusable projects or recover them the next time you start FDRTools.


