1 Overview
FDRCompressor Plug-In serves the compression of the tonal value range of an image (tone mapping). This method has many valuable applications:
- with RAW images and JPEG images:
- Illumination of shadowy areas
- Enhancement of contrast
- with HDR (High Dynamic Range) images:
- Dynamic Range Compression
- Visualisation for normal media like monitor or print
- Conservation of contrast and details
This tutorial shows the usage of FDRCompressor Plug-In for the above mentioned applications.
Using the Plug-In is simple and intuitive.
2 Compatibility
FDRCompressor Plug-In has been tested to work with Photoshop CS2, CS3 and CS4 (32-bit) and with the operating systems Windows XP and later and OS X 10.5 (Leopard) and later.
3 Installation
Windows: Installation is carried out by an installation program. At the end of the installation a dialog displays the Photoshop versions that are installed on the computer. Please choose for which versions the plug-in shall be installed. You can also determine the directory where the plug-in shall be filed.
OS X: Drag the plug-in bundle to a folder that is searched for plug-ins by Photoshop, e.g. /Applications/Adobe/Photoshop CS4/Plug-ins/Filters' for CS4.
4 Controls
The user interface can be divided into four parts, see Fig. 1:
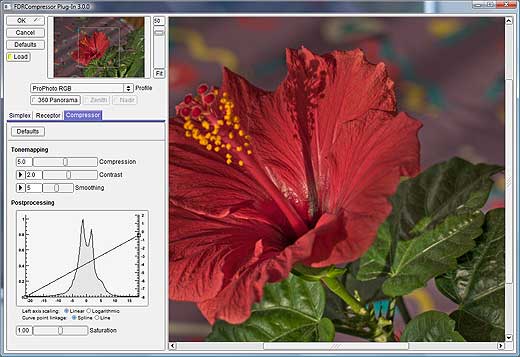 |
| Fig. 1: FDRCompressor Plug-In |
- The upper left area with buttons and the 'Navigator':
- Button Register: pressing this button shows a dialog that allows you to register the plug-in, i.e. enter your license key.
- Button OK: start calculation of the resulting image and save all user interface parameters.
- Button Cancel: quit the plug-in without doing anything. Don't save user interface parameters.
- Button Defaults: reset all user interface parameters to their default values.
- Button Load: use saved user interface parameters next time the plug-in is executed. If the switch is off default values will be used. Note that you have to switch 'Load' on if you intend to use the 'Filters->Last Filter' function in Photoshop. If 'Load' is off the Filter will be executed using default values.
- The Navigator: shows an overview of the image and lets you navigate around by clicking a spot of the image with the mouse. The outlined rectangle shows the area that is displayed in the 'Preview' to the right.
- Scale slider and Fit button: you can scale the 'Preview' from 100% down to 10%. The 'Fit' button fits the image to the 'Preview' area and rescales the scale slider from 100% down to whatever percentage value 'Fit' calculates.
- Image properties:
The Profile menu button allows you to adjust the color profile of the image. Make sure that the profile matches the 'Document Profile' in Photoshop - you can get this info from the pop-up menu at the bottom of an image document.
Rationale: the need for this button arises from the fact that Photoshop Plug-In API does not publish usable information about the color profile of an image document. Hence no color profile information is available to filter plug-ins. For FDRCompressor this means that the displayed colors can deviate from the colors displayed in Photoshop. The Profile button allows you to correct this problem.
The three buttons below allow you to adjust the geometry of a panorama image (these buttons formerly belonged to the Compressor tone mapping module):
- Switch 360 Panorama: activate this switch if the image is a 360° panorama (cylindrical or spherical). The panorama must be in the so called equirectangular projection. This is a common form of projection in panorama photography; for more details see Panorama Tools.
- Switch Zenith: activate this switch if the panorama has a zenith.
- Switch Nadir: activate this switch if the panorama has a nadir.
- The lower left area with the tone mapping modules. Usage of the Simplex and Receptor tone mappers is identical to FDRTools and is described in the User manual. Please look there to read about the function of buttons and sliders. The Compressor tone mapper has been augmented with new controls:
- Tonemapping
- Compression: Regulates the strength of tonal range compression. More likely affects local contrast.
- Contrast: Substantially affects the contrast of the image. Low values result in smooth transitions - the image will look blurred. High values yield strong local contrasts - the image will look sharp. Clicking the toggle button to the left of the Contrast slider opens two additional controls named Frequency and Luminance:
- Frequency: lets you control the contrast with respect to frequency bands. The x-axis ranges over the frequency components beginning with lowest frequencies. Low frequencies stand for large scale features while high frequencies stand for fine details. Adjusting the Frequency curve you can influence blurriness and sharpness respectively.
- Luminance: lets you control the contrast with respect to pixel luminance. The x-axis ranges over the pixel luminance beginning with lowest luminance. Low luminance stands for "dark" pixels while high luminance stands for "bright" pixels. Adjusting the Luminance curve you can influence contrast in dark areas and bright areas respectively.
- Smoothing: Regulates the definition of image details. Low values yield less defined details, especially large scale features are less defined. High values result in well defined image details - the result will have smooth transitions. Using an analogy to painting one could also describe the effect of this slider as regulating the covering application of paint. Clicking the toggle button to the left of the slider opens an additional control which lets you control Smoothing with respect to frequency bands. The x-axis ranges over the frequency components beginning with lowest frequencies. Low frequencies stand for large scale features while high frequencies stand for fine details.
-
Postprocessing (applies to all tonemappers)
- The parameters handled above determine the result of the local tone mapping algorithm. However, this is not what is handed over to Photoshop. Instead the tone mapped image is mapped a second time using the 'Postprocessing' parameter settings. The main part of this mapping is an adjustable 'curve' displayed in front of the tone mapped histogram.
- Tone mapped histogram: the displayed histogram is obtained from the luminance channel of the tone mapped image. The bottom axis scaling changes with the tone mapping parameter settings. It is not usable and not important but is of informational value. The left axis scaling is a measure of the number of entries per bin. It is of informational value only.
- Output dynamic range: the scaling of the right-hand axis is important. It determines how the (varying) range of the tone mapped image will be mapped to a constant output range. Using the curve knots you can adjust the mapping. The default setting for the curve does the following: the left knot maps the darkest pixel of the tone mapped image to -8 while the right knot maps the brightest pixel to 0. The output values are a measure of the output dynamic range and are in log base 2 units or EV or f-stops. In effect this means that the 'white point' with value 0 has 256 times the luminance of the 'black point' with value -8.
- Curve knots: you can drag around the knots if you want to change the ranges. Note that dragging the left knot to the left/right you can widen/narrow the displayed tone mapped range - dragging the right knot works alike. This way you can "zoom" the tone mapped range. You can of course add knots and remove knots in order to achieve a more sophisticated mapping.
- Options:
- Left axis scaling: the scaling of the left-hand axis can be changed from linear to logarithmic. This alleviates the perception of the histogram tails.
- Curve point linkage: the curve knots may be linked via splines (smooth curve) or via lines.
- The Preview area. Using the 'Preview' should be self explaining.
5 Example RAW image
The potential dynamic range of digital camera RAW images is higher than what can be displayed
properly on a monitor. As a consequence many RAW images appear dark and dull without special
treatment.
The following image comparison illustrates this with an example of a partly sunlit flower.
The RAW image is compared to the results achieved with Adobe Camera Raw Defaults and FDRCompressor:
Please execute the following steps to reproduce the FDRCompressor result:
- Download HibiskusRot.jpg (906 KB).
- Due to the large file size this is not the original RAW image. However, the image was created with Adobe Camera Raw from the original, converted to 8-Bit and finally saved as JPEG with embedded ICC profile.
- Load the image to Photoshop.
- Start the Plug-In with Filter -> FDRTools -> FDRCompressor...
- Adjust the FDRCompressor parameters as shown in Fig. 1. All parameters are at their default values except the gradation curve. The two points were moved in order to adjust black and white points. Take care to adjust the profile to "ProPhoto RGB" so that colors are displayed accurately!
- Start the calculation with OK.
As an alternative try smaller values for Compression and Contrast, for example 2.0 for Compression and 1.0 for Contrast.
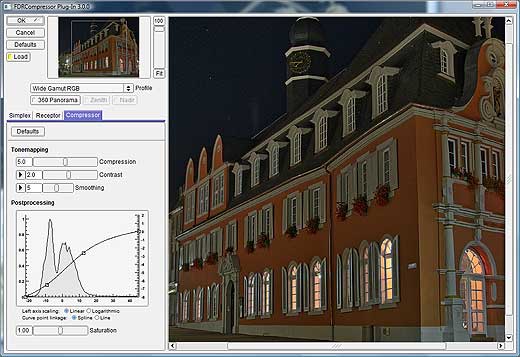
6 Example HDR image
The following figure shows a typical example for an HDR image. It was made from several differently exposed images merged with FDRTools.
The difference between largest and smallest exposure value is enormous: about 19 EV. Without compressing the dynamic range this image can not be displayed properly on a monitor.
Hence the uncompressed HDR image is partially black and partially white. The other versions show a comparison between Photoshop CS2 Local Adaptation and FDRCompressor:
Please execute the following steps to reproduce the FDRCompressor result:
- Download AltesRathaus.hdr (2,5 MB).
- Load it to Photoshop.
- Assign the image the Wide Gamut RGB color profile with Edit - Assign Profile....
- The image was created and saved in Wide Gamut RGB color
space. This must be assigned manually here because the used file format Radiance RGBE does not
allow to embed an ICC profile.
- Start the Plug-In with Filter -> FDRTools -> FDRCompressor...
- Adjust the parameters approximately as shown in figure 4.
- Adjust the profile to "Wide Gamut RGB" so that the colors are right!
- Start the calculation with OK.
| |
 |
| |
Fig. 4: The FDRCompressor parameters |
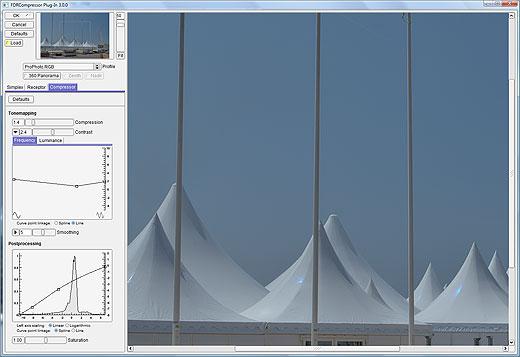
7 How to avoid "halos" and "spots"
The Compressor tone mapper sometimes produces so called "halos" and/or "spots". Halos are seams along edges appearing unnaturally bright. Spots are regions appearing unnatural dark or bright. Spots result in a patchy illuminated image look. It depends on the scene and the Compressor parameter settings whether such artefacts appear or not.
If you encounter halos in a tone mapped image you can remove them by adjusting the Frequency components of the Contrast parameter.
If you encounter spots in a tone mapped image you can remove them by lowering the Compression parameter value.
Look at the following image comparison. The first version shows the original image followed by the Compressor result using default parameter settings. You can perceive slight halos along the pylons. In order to make them better visible the next image shows the Compressor result additionally processed with Photoshop 'Auto Levels'. One can not only perceive halos along the pylons but also dark looking spots inside the pylons. The last image shows a clean image that results from properly adjusting the Compressor parameters.
Please execute the following steps to reproduce the FDRCompressor result:
- Download CannesCroisette.jpg (by courtesy of Alessandro de Simone) (982 KB).
- Due to the large file size this is not the original RAW image. However, the image was created with Adobe Camera Raw from the original, converted to 8-Bit and finally saved as JPEG with embedded ICC profile.
- (Alessandro kindly provided CannesCroisette.jpg for demonstration purposes in the context of this tutorial. Do not use CannesCroisette.jpg for other purposes please.)
- Load the image to Photoshop.
- Start the Plug-In with Filter -> FDRTools -> FDRCompressor...
- Adjust the profile to "ProPhoto RGB" so that colors are displayed accurately.
- Adjust the FDRCompressor parameters. Note that there is no need to exactly adopt the following numbers. Keep in mind that the example wants to show you which parameters to adjust and how to adjust them.
- Compression: 1.4. In general lower the value until the spots disappear but keep it as high as possible in order to achieve good details and contrast.
- Contrast: 2.4. Adjust the Frequency curve as shown in Fig. 6 (to access the Frequency option click the arrow button left to the contrast slider). Set the 'Curve point linkage' option to 'Line'. The intention here is to lower the impact of frequency components that are responsible for the halos.
- Adjust the gradation curve as shown in Fig. 6.
- Saturation: 1.30
- Start the calculation with OK.
| |
 |
| |
Fig. 6: The FDRCompressor parameters |
8 Limitations
Currently the Plug-In still has some limitations:
- CS4 64-bit is not supported.
- Smart filter functionality is not supported.
End.
Do you have questions or suggestions? If so you may want to publish them on the Forum.
|


